Overview
Psoda is very flexible when it comes to setting up user security profiles. Unfortunately, this flexibility can be a double-edged sword and can get very complicated very quickly.
This guide explains all the different options available for controlling user access and current best practices for simplifying the security profiles.
Throughout the guide the best practice comments are highlighted with a light green background like this.
Warnings are highlighted with a light red background.
Organisation-level settings
Security settings
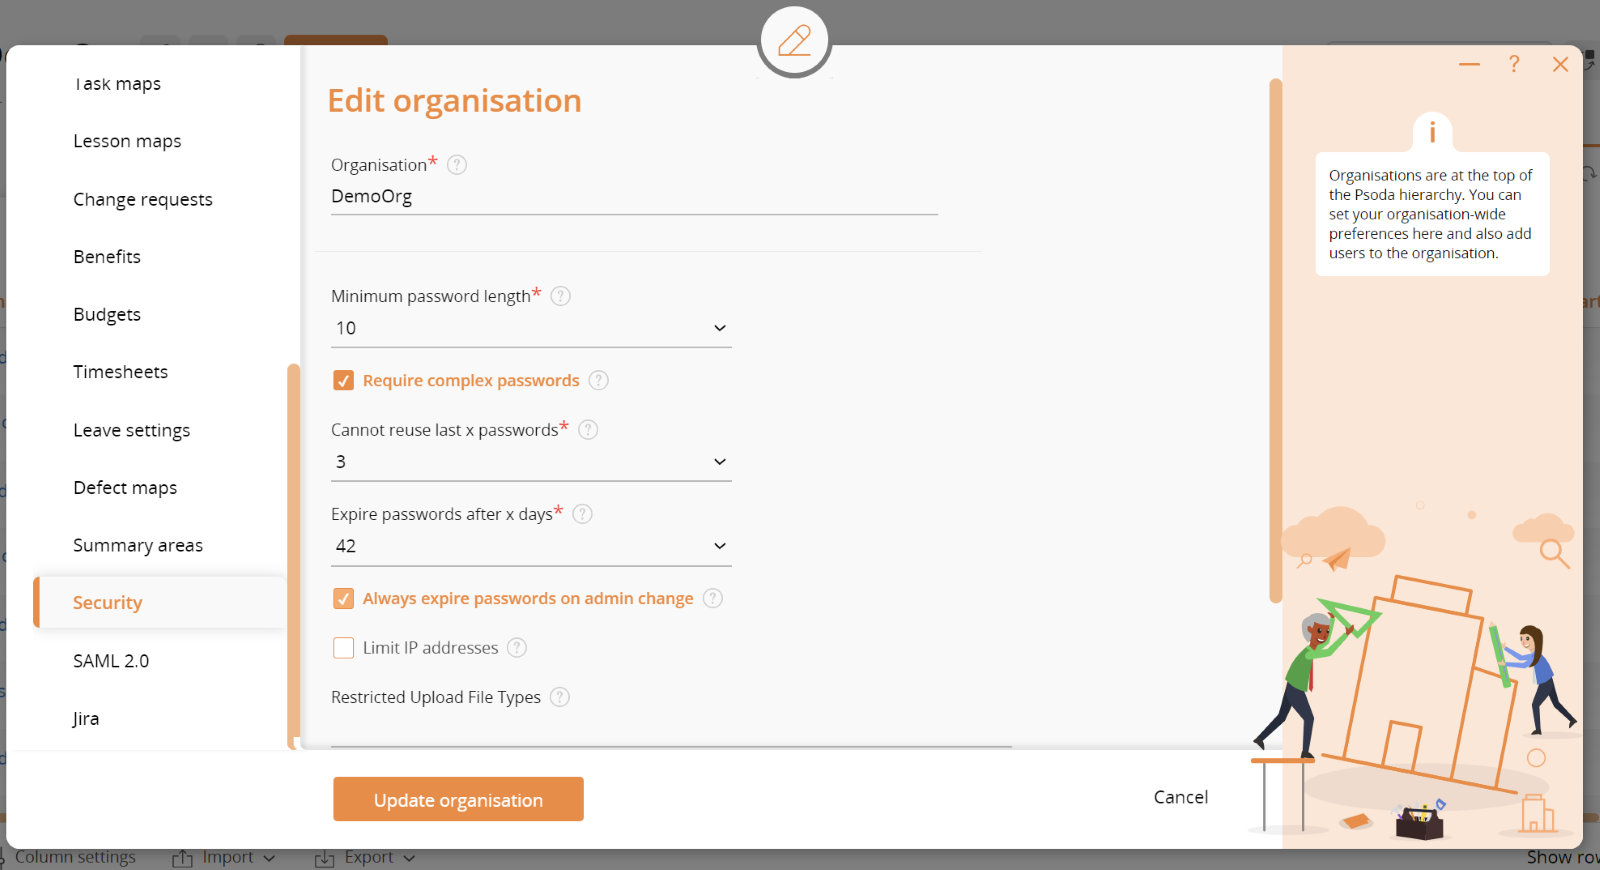
The organisation-level security settings apply to all users of that organisation. These settings are available by editing the organisation and navigating to the Security tab. An example is shown in Figure 1 below:
Figure 1 – Organisation security settings
The following table describes each of these options in more detail.
| Option | Description |
|---|---|
| Minimum password length | Use this option to set the minimum number of characters a password must be. |
| Require complex passwords | This option requires that password must have three out of the follow four types of characters: lower case, upper case, number or symbol. |
| Cannot reuse last x passwords | This option sets how many of your previous passwords cannot be reused. For example if it is set to 2 then the last 2 passwords cannot be used to set your new password. |
| Expire passwords after x days | This option sets how long a password will last before it is automatically expired. Although there is a no expiry option it is not good practice to use this option unless users are only allowed to log in via SSO. |
| Always expire passwords on admin change | Best practice is to force users to change their passwords the first time they log in with a new password that was set by an administrator. This ensures that the administrator does not know the users’ passwords. Setting this option will enforce this practice. |
| Limit IP addresses | You can use this option to limit the IP address range(s) that users can log in from. For example users must log into your corporate VPN and only IP addresses from your corporate network are allowed to log into Psoda. This gives an extra level of protection against hackers trying to access your data in Psoda, however it does restrict your users to first logging into your VPN and then into Psoda. |
| Restricted Upload File Types | Use this option to set a list of filename extensions your users are allowed to upload to Psoda. Any other extensions will be blocked before the user can upload them. For example you might allow your users to upload image files such as png, jpg, gif, office documents such as doc, docx, xls, xlsx, etc. This can block malicious files such as exe or bat files from being uploaded. |
- 10 characters minimum password length
- Require complex passwords
- Cannot reuse the last 3 passwords
- Passwords should expire within 42 days
- Always expire passwords on admin change
- White listing upload file types
Single Sign On settings
Single Sign On (SSO) allows your users to log in once into the corporate network and then be able to access their various applications without having to sign into each one again.
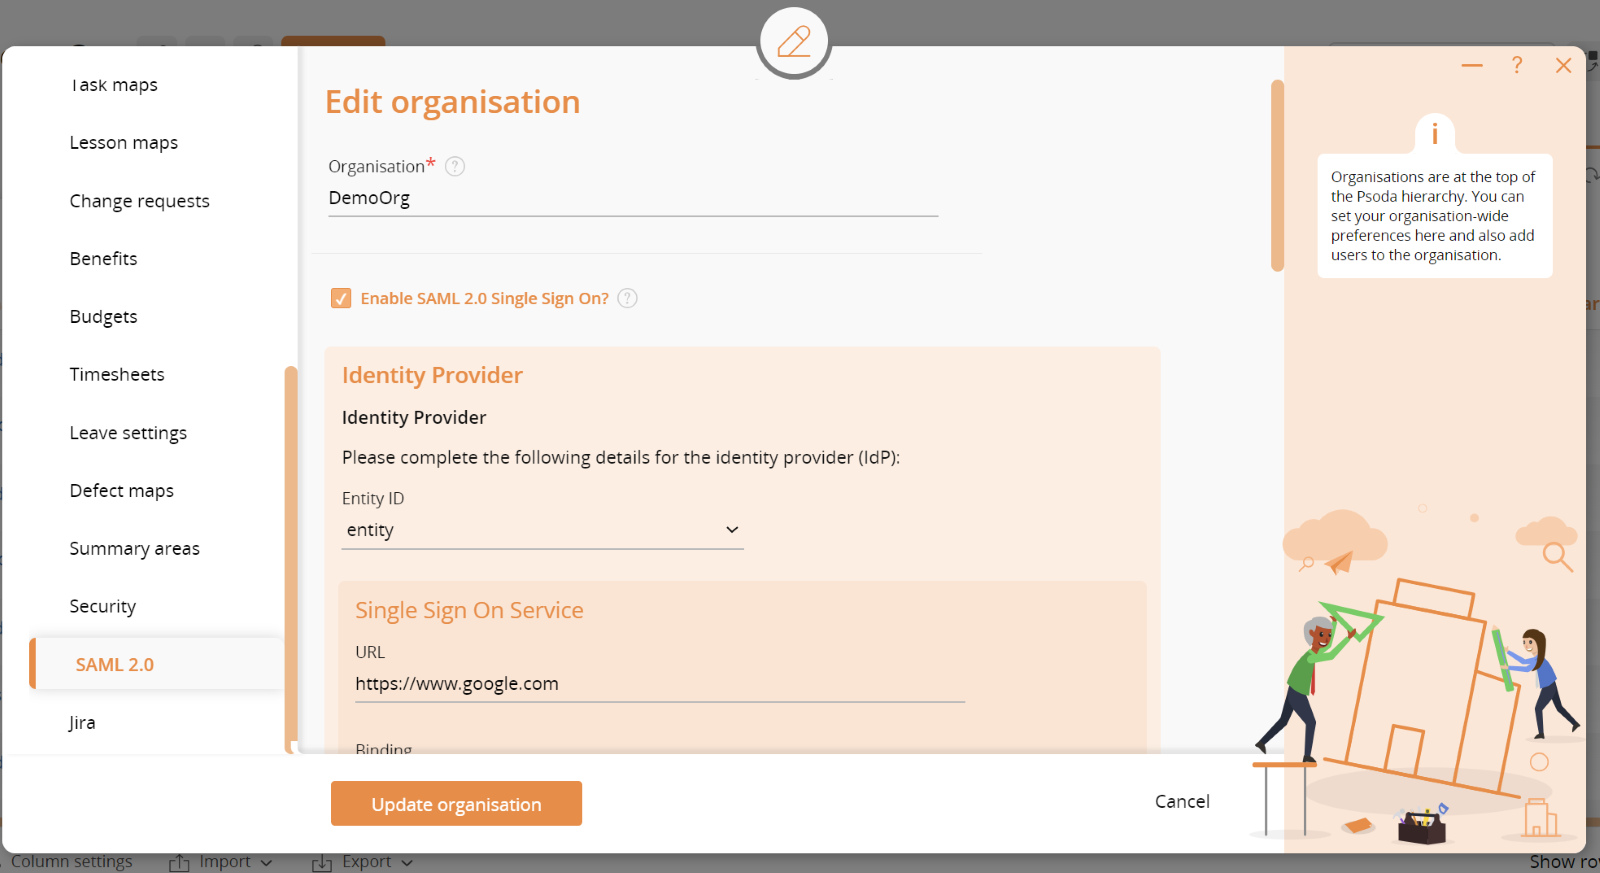
Psoda supports Single Sign On via any SAML2 compliant identity provider such as Azure AD, ADFS, Okta etc. This is enabled from the Edit Organisation popup and selecting the SAML2 tab. An example is show in Figure 2 below.
Figure 2 – Single Sign On settings
When you tick the box to Enable SAML 2.0 Single Sign On you get a series of fields to fill in with the details from your identity provider (IdP). The administrator for the IdP will be able to get these settings and the certificate for you.
The second section provides details that your administrator will have to configure in your IdP.
We can work with your administrator to get this area set up correctly and to test the SSO configuration.
User-level security settings
These settings are used to set an individual user’s access rights. The settings can be changed while creating a new user or by editing an existing user and then selecting the Security tab.
Groups
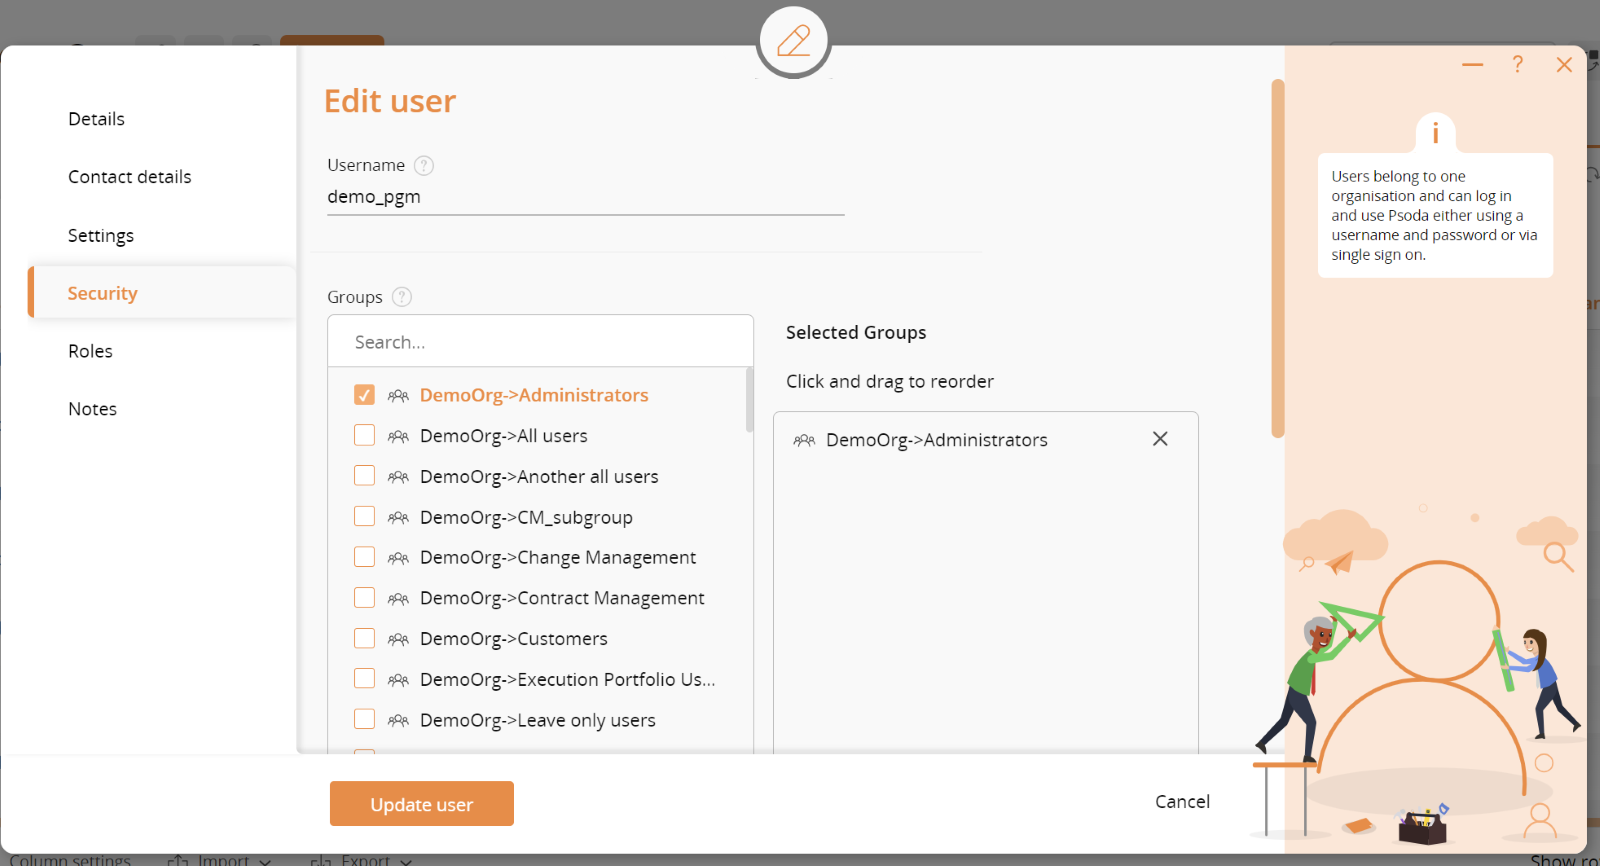
The first section on the security tab allows you to select the group(s) the user is a member of. Select groups in the left-hand column and remove them in the right-hand column. You can also search for groups by name.
Figure 3 – Selecting the security groups for a user
The groups are discussed in more detail in the section below on Security groups and ACLs (page 8).
Licences
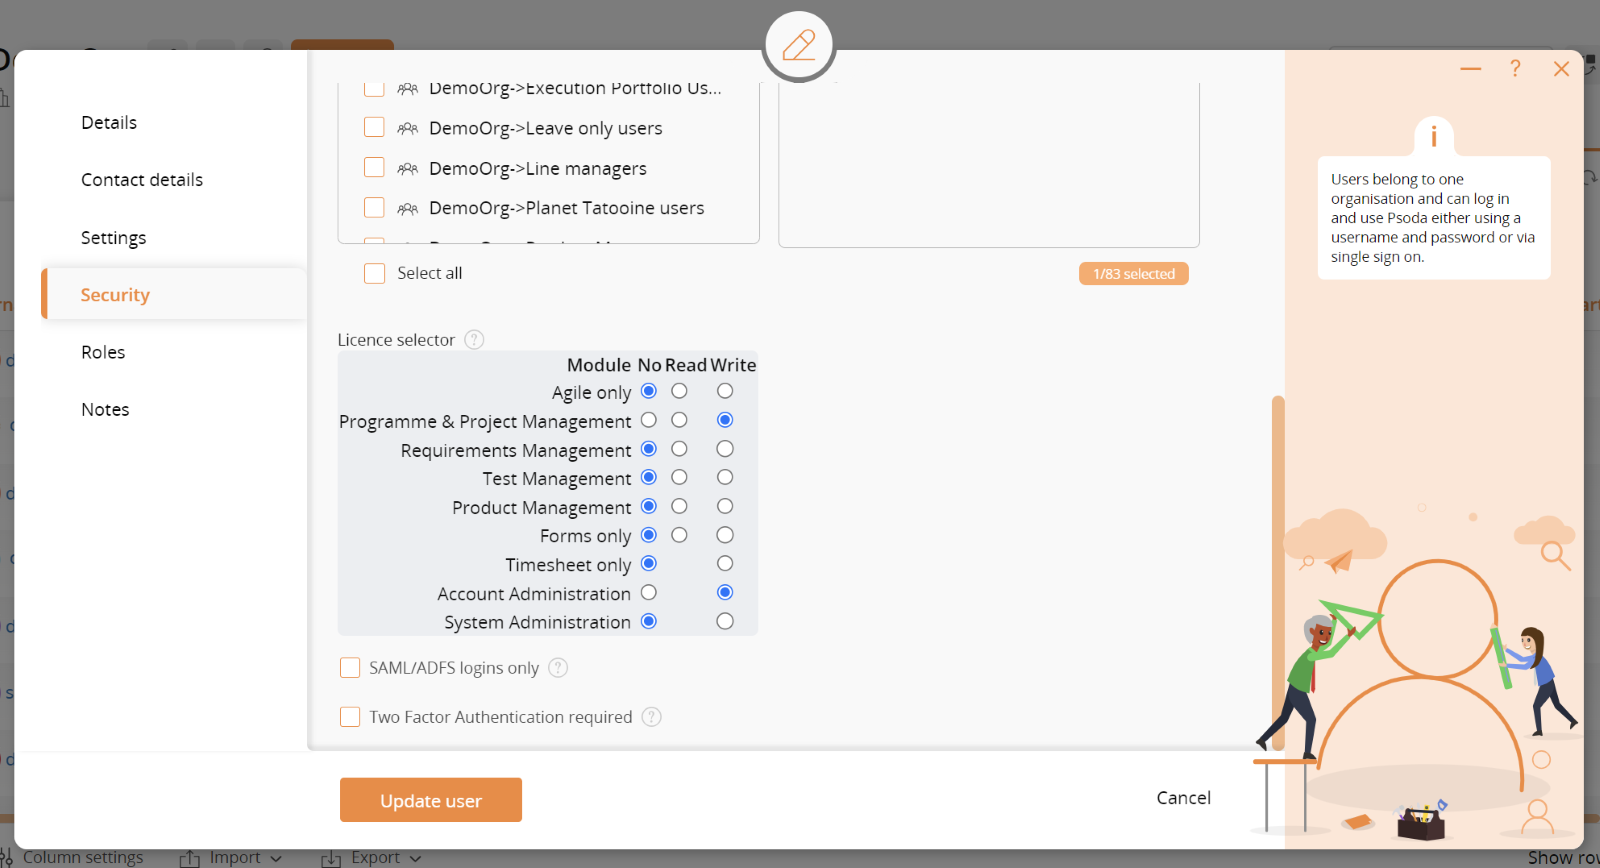
A user’s licences can be selected on the Security tab when creating/editing that user. Figure 4 below shows the Licence selector for a user:
Figure 4 – Licences and other security settings for a user
If the No column is selected then the user gets no access to that module, if Read is selected then the user gets read-only access to that module and if Write is selected then the user gets write access to that module. A module is this case is each of the functional areas e.g. Programme and Project Management or Requirements Management.
We only charge for write-access licences for users who are set to the Active status. Users in the New and Suspended statuses cannot log into Psoda and are not charged.
The table below describes each of the licences:
| Licence | Description |
|---|---|
| Agile only | Gives the user access to all of the Scaled Agile Framework functionality including Sagas, Epics, Capabilities, Features, User stories, Tasks, Personas, Teams, ROAM risks and Kanban boards. |
| Programme & Project Management | Gives the user access to all of the portfolio, programme and project management functionality including schedules, GANTT charts, resource management, risks, issues, decisions, lessons, budgets, etc. |
| Requirements Management | Gives the user access to capture the scope on their projects including high level requirements, detailed requirements, functional, non-functional, etc. Also allows the user to evaluate different solutions or RFx responses against the requirements to calculate a weighted score. Users can also analyse the impact of change via requirement traceability. |
| Test Management | Gives the users access to write test cases against their projects with traceability from requirements to ensure test coverage. Test cases can be broken down into individual steps. Test runs can be set up with a selection of test cases to include and the test results recorded. If any defects are found during testing these can be recorded to show the steps the tester went through to get to that point in the testing. |
| Product Management | Gives the user access to manage their product lifecycles including capturing features required, creating a release roadmap, capturing high-level resource requirements, watermarking features that could fit into a release, managing change requests, issues and defect on those releases. |
| Forms only | Allows a user to log into the Psoda forms app and fill out multi-stage forms, save their forms and come back later, to submit their forms and to track the progress on the processing of their forms. |
| Timesheet only | Allows the user to fill in a weekly timesheet against project and other tasks such as leave that is allocated to them. The user can also add expense claims to their timesheets before they submit them for approval. These users can also be assigned on actions in their projects. |
| Account administration | Gives basic admin access to a user to allow them to add new users, edit users and assign the users to existing security groups. Giving a user account admin access could allow them to then create a full administrator user and thus escalate their access rights. These accounts need to be carefully constrained using ACLs to prevent this from happening. |
| System administration | System administrators have access to all the other modules as well as administrator functions such as creating and editing users, changing security groups and ACLs, adding custom fields, custom workflows, custom forms, custom checklists and custom reports. |
A user can have multiple licences selected e.g. a test analyst might have read-only selected for Requirements Management so they can see all the requirements on a project but not edit them; and write access for Test Management so the analyst can create new test cases and test steps for each project.
We have structured the licences to minimise the need for multiple licences for a single user. Having a user with multiple write access licences selected should be rare.
Administrators only need the Write access on the System Administration licence. This gives them access to all the other modules as well.
SAML/ADFS logins only
By ticking this box the user will be required to always log in via the Single Sign On provider. If they did try to log into Psoda with a username and password they will be redirected to the SSO login page before they will be able to access Psoda.
For administrators it’s best not to turn on this option. This will allow the administrator to still log into Psoda even if the SSO provider is not available. This should be done in conjunction with two factor authentication described in the next section.
Two Factor Authentication required
By ticking this box the user will be required to complete a two factor authentication process before they can log into Psoda. The user will be sent an email with a 5 digit code which they then need to copy into Psoda before they will be fully logged in.
This only applies if the user logs directly into Psoda using a username and password rather than using the Single Sign On process.
Administrators should always be required to use two factor authentication to comply with the NZISM.
Security groups and ACLs
The user’s licences give them a base level of access to Psoda. The security groups and associated Access Control Lists (ACLs) refine the user’s access.
For example, a user may have the Write access to Programme and Project Management licence, however they can only see and edit a specific project and they cannot see any other programmes and projects based on the group they are in.
The security groups can be added to the organisation and can have sub-groups and sub-sub-groups, etc. The sub-groups inherit the permissions from their parent groups. For example, a project security group would normally inherit the permissions from its parent programme’s security group.
Use the description on the group to explain how the group is intended to be used and what access it will give members and any sub-groups.
There are some default groups automatically created in Psoda. These are described in the next section.
Zero or more ACLs can be added to a security group to define the access for that group, although a group with no ACLs would not add much value.
Each ACL points to a root node in the organisational structure e.g. a specific programme or project. The ACL applies to that root node and everything below it. For example, if an ACL gives read access to a programme then the members will get read-only access to that programme and all sub-programmes/projects below.
ACLs are evaluated from the bottom up so that more specific ACLs will override less specific ACLs. For example, let’s say a user is in two groups with one ACL giving read-only access at the organisation level and the other ACL giving write access to a specific project. When the user visits the specific project then that ACL applies and the user gets write access. If the user navigates to a different project then Psoda will check for ACLs at that project level, then the programme above it and so on until eventually it reaches the organisation level ACL and gives the user read-only access.
ACLs can also have role-based modifiers. For example this ACL only applies if the user is named as the manager on the project. See the section on Role-based ACLs below for more details.
Use description field on the ACL to explain the intent of the ACL so that future administrators will understand and not modify the ACL with unintended consequences.
Default groups
When an organisation first registers for an account in Psoda the “Administrators” and “All users” groups are automatically created.
Combining the System Administrator licence and the Administrators group gives a user the maximum access within your organisation’s instance in Psoda.
Never update the Administrator group’s ACL. This ACL is automatically updated every time a new Psoda release goes live to ensure Administrators have access to all the latest functionality in Psoda so any changes you make will be lost.
If you need to create a group with restricted admin access you can do this by creating a sub-group to the Administrators group and adding an ACL for this sub-group. The sub-group’s ACL will NOT be updated when the Administrators ACL get updated.
Administrator users should never be added to any other groups within the same organisation as this will likely reduce their actual access.
Non-admin users should never be added to the Administrators group as it may inadvertently give them more access than intended.
The “All users” group by default only allows the user to log into Psoda and very little else. This ACL will likely be updated during the implementation phase to configure the base level of access for all internal users. This ACL is NOT updated automatically when new functionality is rolled out for Psoda. This allows the Administrators to first evaluate the new functionality before turning it on for other users.
Access rights for external users are most commonly separated from the “All users” group into a new group directly under the organisation. This prevent the external users from accidentally inheriting new access rights when the All users ACLs are updated.
Every time a new programme or project is created using the normal add buttons Psoda also creates a corresponding group and ACL. If the programme/project is added directly under the organisation then the corresponding group will be added under the “All users” group. Otherwise the new group will be added under the corresponding parent group. This allows the groups to follow the same hierarchy as the programmes and projects.
The default programme ACL gives read-only access to that whole programme while the default project ACL gives write access to that project. These defaults can be replaced by using template programmes and/or projects with new security settings. This is discussed in the next section.
Using role-based ACLs can completely remove the need for programme or project-based security groups and ACLs thus simplifying the security maintenance significantly. See the section on Role-based ACLs (page 10) for more information.
Templates
Administrators can create template programmes and projects in Psoda. These templates can be set up with custom security profiles, default risks, milestones, documents, etc.
When a user then needs to add a new programme or project they can select one of the templates and all the settings are copied to their new programme/project automatically.
If role-based ACLs are used instead of programme/project groups and ACLs then the template programmes/projects should be set up without any associated groups and ACLs. This will ensure the new programmes/projects created from the templates do not have corresponding groups and ACLs added as well.
Role-based ACLs
Having programme and project level groups and ACLs provides a lot of flexibility to set up different access rights across the organisation. It does require a lot of groups and ACLs to be maintained and makes adding/updating users more complicated as the administrators need to figure out which groups to add the users to. It also makes maintaining the ACLs more complicated. For example to turn on a new function the template ACL must be updated and then re-applied to all the existing projects. This becomes much harder when different programmes/projects have different ACLs.
To simplify this, we have added role-based ACL modifiers. For example, a group might be added under “All users” called “Write access for all project managers”. This group has an organisation-level ACL with the “If project manager” modifier ticked.
If a user is a member of this group and they have been selected as the manager on a project, they automatically get the write access to that project. If the user is replaced later with a different project manager, they automatically lose the write access they had.
To update the project-level access for all project managers now only needs one ACL to be updated.
ACLs with a modifier only apply to the area where the modifier applies. For the project manager example above they only get the write access within the project where they are the project manager and everything below that point. The modifier ACL gives no access outside of that context. So the PM doesn’t get any access to the parent programme unless there is another group/ACL which gives them that access.
The following ACL modifiers are available:
- If line manager
- If programme manager
- If programme sponsor
- If programme owner
- If project manager
- If project sponsor
- If project owner
- If role manager
Rather than having a group and ACL for each programme and each project it is better to have organisation-level groups and ACLs with modifiers to apply to the specific roles. Organisation level ACLs can provide for example read-only access to all other programmes and projects.
Exceptions
Sometimes specific areas in Psoda need to be hidden from the general users and only specific users should have access. This is done in two steps: add ACLs to block access for general users and create a new group and ACL to give the specific users access. Both the block ACLs and the new group would normally be added to the “All users” group.
If only the Administrators needs access to a particular area for example a testing area then these can be blocked by just adding an ACL to All users without the need to create another group and ACL.
Test all changes to security groups and ACLs by impersonating some users in the relevant groups and checking that they have all the access they need and none of the access to are not supposed to get.
Portfolio groups and ACLs
Portfolios in Psoda can be used to create ad-hoc groupings of programmes and projects. These portfolios can then be used for reporting, dashboards and roll-up of the selected members’ data. The programmes and projects can be included in more than one portfolio for example if the same information needs to be rolled up into different segments. Note that users can only add programmes/projects to a portfolio if they have edit rights to the individual programmes/projects as well as the portfolio.
Portfolios can also be set to automatically include projects based on some rules e.g. if a custom field is set to a particular value or set of values.
If you set up a security group with an ACL pointing to a portfolio then the ACL will apply to the portfolio as well as all the members of the portfolio. This provides an easy way to give somebody access to a selection of programmes/projects without having to create ACLs for each individual programme or project. Just add programmes/projects to the portfolio and the users automatically get the same level of access.
The downside of using portfolio ACLs is that the processing of these ACLs is quite complex and will slow down the overall evaluation of a user’s access. To minimise this impact Psoda checks if a user has any portfolio-level ACLs when the user logs in and turns off the portfolio ACL processing if there are none, making the evaluation much faster. As soon as there is even a single portfolio-level ACL that processing must be turned on and the user’s security evaluation slows down.
Do not use portfolio-level ACLs unless it is the only way to achieve a particular security outcome.
Workflow ACLs
Workflow ACLs can be used to control user access based on the workflow state that the asset is in. For example once a risk is moved to the Closed state block the users from editing the risk.
Each workflow state has an associated ACL. By default, these ACLs have everything turned on, i.e. the user can do anything that their licence and security groups allows.
If a function is turned off in the workflow state ACL and the asset is in that state then the function is not available to the user. I.e. the workflow state ACL, the user’s licence and the user’s group ACLs must all have the function turned on for the user to have access.
Workflow ACLs do not normally apply to administrators, allowing them to still edit those items that are closed. Workflow ACLs also cannot block a user from requesting a transition on the asset which would move it back to another state.
Turn off any edit/move/delete/add type functionality in any closed/cancelled/archived states in workflows to ensure users can no longer edit those assets.
Workflow states
If you want to hide a particular workflow state from all of your users except for the administrators then you can add an ACL to the “All users” group to block access to that specific state. If you want to make this state visible to a select group of users then you can create a sub-group under “All users” (if it does not exist already) and add an ACL to the sub-group giving specific access to that workflow state.
Workflow transitions
Sometimes you may want to limit which users can perform a particular workflow transition. For example, a project manager may be allowed to submit their project to a gateway but only their sponsor can approve the project to the next phase.
To achieve this an ACL needs to be added to the “All users” group to block everybody from requesting that transition. Then create a group for the sponsors (if it does not exist already) which allows them to request that transition.


